How to use keyframe in Capcut From Basic to Advanced 2025

Keyframing in CapCut is like adding magic to your video edits. It lets you create smooth transitions, animate objects, and bring your ideas to life, all with just a few taps. A keyframe in CapCut is a tool that allows you to set specific points in a timeline to animate changes in an element’s position, size, or effects.

What is Keyframing?

Keyframing is the process of setting specific points in a timeline to define the start and end of an animation or change in an element’s properties. By setting a start and end point, you can create smooth transitions and animation effects. Keyframing brings motion and creativity to otherwise static elements.

keyframing in capcut

Why learn keyframing?

For new editors, learning keyframing is super important. Without it, making custom animations or cool effects can be really hard. Keyframing is what makes animations possible, letting you add life to still text, images, or videos. Once you get good at it, you can create amazing transitions and eye-catching effects that will wow your audience.

What is keyframing in capcut and keyframe in capcut?

Keyframing in CapCut is a feature that lets you create smooth animations by setting specific points in the timeline where changes occur in an element’s properties. With keyframe in CapCut, you can adjust movements, sizes, rotations, and opacity to add dynamic effects and transitions.

Basics of keyframing

Keyframing is a straightforward yet powerful tool. Let’s break down the process using examples from tools like CapCut:

keyframing technique basics

Adding a frame

  • Select the object (text, image, or video) you want to animate.
  • On the timeline, look for a diamond-shaped icon. Clicking it adds a keyframe at the current timeline position.
  • Adjust the object’s property (e.g., position, size, or opacity). The software automatically links this adjustment to the keyframe.
  • Move the playhead (the indicator of your current timeline position) to a keyframe to make changes. Selected keyframes will often change color to indicate they are active.

Removing keyframes

  • To remove an unnecessary keyframe, select it and press the “minus” icon near the timeline.

Understanding Default Properties:

  • By default, keyframes adjust position and size unless you specifically modify other properties like color, opacity, or rotation. This makes it easier to work with animations focusing on movement.

Keyframing process

keyframing process
  • At the bottom of the graphic, we have a timeline that runs from 1 second (1s) to 3 seconds (3s). It represents the duration of the animation sequence.
    The Keyframes:
  • The three red circles are keyframes, the pivotal points in the animation. Each keyframe represents a major position or state of the object at a specific time:
    At 1 second, the object starts on the left.
    At 2 seconds, it reaches its peak position (center and larger).
    At 3 seconds, the object transitions to the right.
  • Motion Path and Tweening:
    The dotted arrows between the keyframes indicate the object’s movement. These intermediate states, or “in-betweens,” create the illusion of smooth motion when animated.
  • Scaling as a Visual Cue:
    Notice the size change of the red circle. It grows larger at the center to imply either a zoom effect or an emphasis on its importance at that keyframe.

Practical Applications of Keyframing

Animating position and size

Animating position is one of the simplest uses of keyframing:

  • Place the object (e.g., a logo) at its starting point and add a keyframe.
  • Move the playhead forward on the timeline and drag the object to its next position. A new keyframe will automatically appear, creating a smooth transition.
  • Similarly, to animate size, adjust the object’s dimensions at different keyframe points.

This technique can create effects like sliding logos, growing text, or even path animations for videos.

Controlling Opacity

Opacity refers to how transparent an element is. Controlling opacity in CapCut allows you to adjust the transparency of an object or layer over time using keyframes. By adding keyframes, you can create effects like fading in or out, making elements gradually appear or disappear.

  • Select the object (e.g., a light image overlay).
  • At the starting point, set the opacity to 0% and add a keyframe.
  • Move forward in the timeline and set the opacity to 100%, adding another keyframe.
  • Use animation graphs, like Bounce 3, to make the flicker more dynamic.

This technique is excellent for creating atmosphere in videos, such as blinking car headlights or fading text effects.

 Background Music Volume Adjustments

Keyframing is not limited to visual elements—it’s equally powerful for audio:

  • Add a keyframe at the start of your voiceover and another just before it begins.
  • Lower the background music’s volume at the second keyframe.
  • When the voiceover ends, add another keyframe to gradually increase the music volume back to its original level.

This technique ensures that voiceovers remain clear and audible while maintaining an engaging background track.

Color transition

Color transitions can add emotional depth to your video:

  • To transition a video to black-and-white, add a keyframe at the point where the transition begins.
  • Adjust the saturation to -50% (or lower) and optionally add a vignette effect for a more cinematic look.
  • Add another keyframe to revert the changes when needed.

Such effects are ideal for storytelling, emphasizing mood shifts or dramatic moments.

Zoom effects

Zoom-in and zoom-out effects are common in dynamic storytelling:

  • Add a keyframe at the point where the zoom starts and another where it should end.
  • Adjust the zoom level by resizing the video frame. The software will interpolate the zoom effect between the two keyframes.

Advanced Keyframing Techniques

Highlighting Specific Areas

To focus attention on specific parts of an image or video while explaining them:

  • Duplicate the image or video.
  • On the original layer, reduce brightness, contrast, and saturation to darken it.
  • Overlay the duplicate image and apply a mask to highlight the desired area.
  • Use keyframes to animate the mask’s movement in sync with your explanation.

This technique is excellent for tutorials or presentations where you need to guide the viewer’s attention.

Day-to-Night Transitions

Simulating a day-to-night transition involves creative use of filters and opacity:

  • Add a filter to darken the scene for the night view.
  • Use keyframes to adjust the filter’s opacity, transitioning it smoothly to 0% as the scene shifts to daylight.
Capcut day to night transition

This effect is particularly useful in travel vlogs or storytelling videos that depict time transitions. To unlock even more features and tools for advanced editing, consider exploring the CapCut Mod APK, which offers premium capabilities for free.

What is keyframe animation

Keyframe animation is a technique used in video editing and animation where specific points, called keyframes, are set to define the start and end of an animation or effect. The software then automatically generates the in-between frames to create smooth transitions between these keyframes.

what is keyframe animation

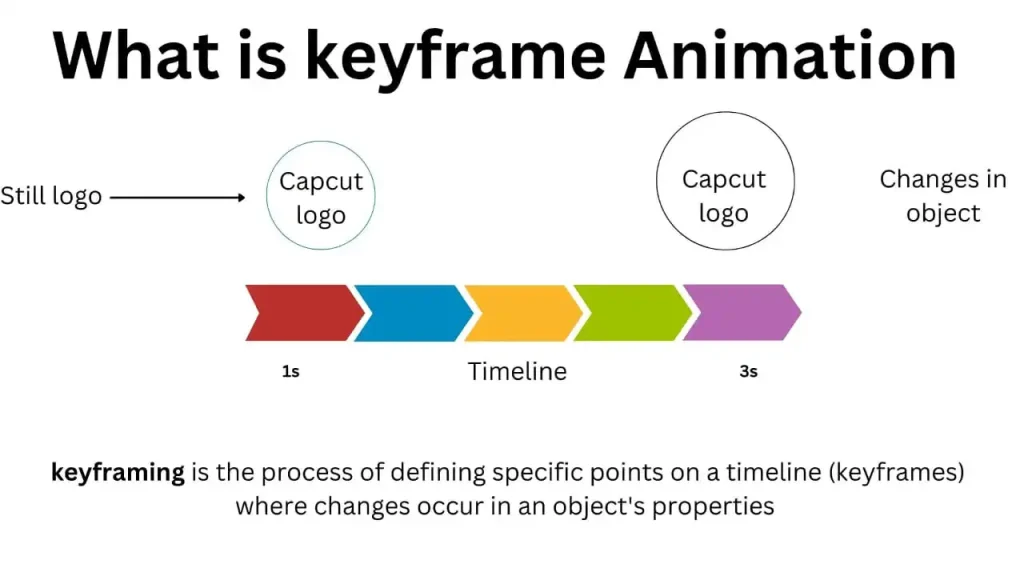
Keyframe animation allows you to control properties like position, size, opacity, and rotation over time, creating dynamic and engaging animations. Keyframe animation is widely used for animating objects, text, and visual effects in programs like Capcut.

CapCut in Keyframe Tips for Effective Keyframing

  • Start Simple: Begin with basic animations like position changes before diving into complex effects.
  • Use Graphs: Animation graphs allow you to control the speed and smoothness of transitions, adding a professional touch to your edits.
  • Practice Masking: Combine keyframing with masking techniques for more precise effects, such as highlighting text or objects.
  • Experiment with Properties: Don’t limit yourself to position and size. Experiment with color, rotation, and opacity for unique results.

Examples of Creative Effects

Blinking Lights

  • Import an overlay image (e.g., headlights).
  • Keyframe the opacity from 0% to 100%, adding animation graphs for a realistic flicker.

Text Animations

  • Add keyframes to the text’s size or color properties to create effects like zoom-ins or color shifts.

Cinematic Mood Shifts

  • Keyframe saturation and vignette effects to transition from vibrant to monochromatic scenes, reflecting mood changes.

Zoom and Rotate

  • Combine zoom effects with rotation keyframes to create a dynamic spinning zoom effect.

Audio Synchronization

  • Keyframe audio properties to match the rhythm of visuals, enhancing the overall impact.

What is capcut keyframe shortcut?

In CapCut, there isn’t a specific “keyboard shortcut” for adding a keyframe, as the app is designed primarily for touchscreens on mobile devices. However, you can quickly add keyframes through the following steps:

  • Tap on the clip or element you want to animate (text, image, video).
  • Tap on the Keyframe icon (a diamond shape) on the timeline where you want to add a keyframe.
  • Adjust the property (e.g., position, size, opacity) as needed, and the keyframe will automatically record that change.

If you’re using CapCut on a PC with an emulator, there may be some shortcuts available depending on the emulator, but generally, the process is done manually in the app itself.

How to move keyframes in capcut?

To move keyframes in CapCut, follow these simple steps:

  • Select the Clip: Tap on the clip or element (text, image, video) that contains the keyframe you want to move.
  • Go to the Keyframe Timeline: Scroll through the timeline where you’ve placed your keyframes.
  • Select the Keyframe: Tap on the keyframe you want to move. The keyframe will highlight to indicate it’s selected.
  • Drag the Keyframe: Once selected, drag the keyframe left or right along the timeline to adjust its position. This will change when the effect or animation occurs in your video.
  • Adjust Properties: After moving the keyframe, you can also adjust the properties of the clip (e.g., position, size, opacity) to fine-tune the animation.

Moving keyframes in CapCut allows you to control the timing of effects and create smooth transitions in your videos.

Frequently Asked Questions

A keyframe in CapCut allows you to set specific points on a timeline where changes occur, like moving an object, adjusting size, or altering opacity.

CapCut animation effects are built-in features that allow you to add dynamic movements and transitions to your videos. These effects include zooms, fades, slides, and more, helping enhance visuals and make your content more engaging.

Yes, keyframes can be used for audio to adjust properties like volume over time, making them ideal for smooth transitions in sound.

If keyframes are too close together, the transition may appear too sudden or jerky. It’s best to space them out for smoother animations.

Final Thoughts

Keyframe in capcut is a simple yet powerful tool that helps you make your videos more interesting. It lets you control how things move, change size, or fade in and out over time. Whether you’re just starting or have some experience, learning keyframing in CapCut can help you create smoother transitions and cooler effects in your videos.

With CapCut’s easy-to-use interface, you can add keyframes to different parts of your video, like text, images, or clips, to make them look more dynamic. The more you practice, the better you’ll get at making your videos look professional and fun. So, start experimenting with keyframes today and see how keyframe in capcut can make your videos stand out!.

Similar Posts

Leave a Reply

Your email address will not be published. Required fields are marked *