Add LUTs in CapCut on PC/Mobile– Quick Color Grading Tips
Videos often look flat or lifeless before color grading. With LUTs in CapCut, you can bring your footage to life in seconds. These color presets instantly enhance tones, balance lighting, and give your clips that cinematic touch every creator wants. Whether you’re editing travel vlogs, tutorials, or reels, using LUTs in CapCut is the easiest way to make your videos look polished and professional—without needing advanced editing skills.
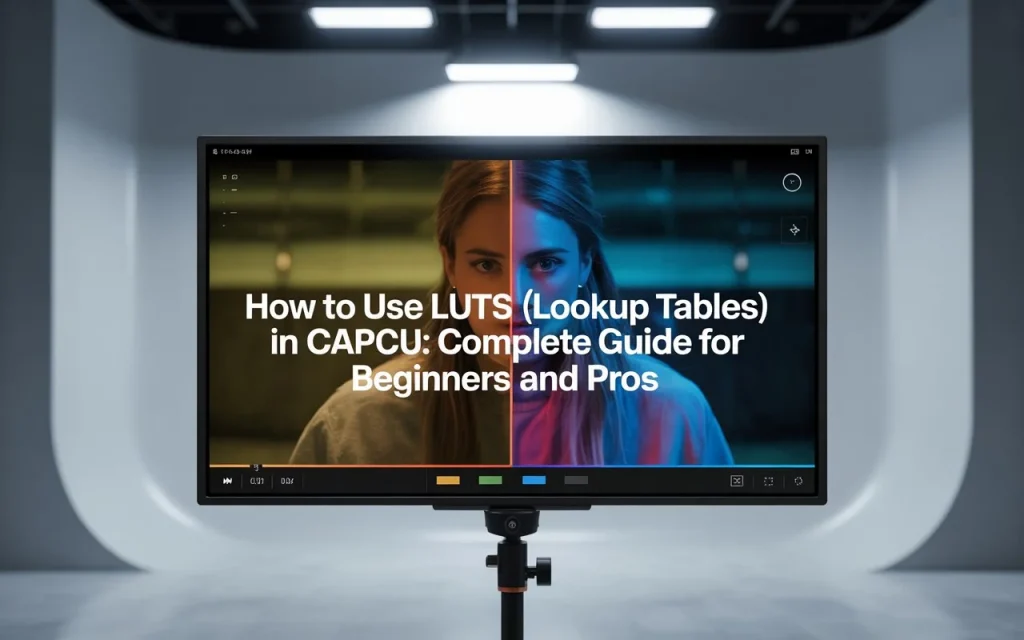
What Are LUTs in CapCut?
Before jumping into how to use them, let’s first understand what LUTs actually are.
LUT stands for Lookup Table — basically, it’s a preset that changes the colors of your video automatically. Think of it as a filter on steroids. Instead of manually adjusting brightness, contrast, or saturation, a LUT does all of that for you in one click.
In simple words:
🎥 No LUT: your video looks flat or unedited.
🎬 With LUT: your video gets that cinematic, professional color tone.

CapCut supports LUTs just like professional editing software such as DaVinci Resolve or Premiere Pro — but with a much simpler interface. You can apply free LUTs available in the app or import your own custom LUT files (.cube format).
If you want to explore more color tools, check out how filters and color grading work in CapCut.”
Why Should You Use LUTs in CapCut?
Using LUTs in CapCut saves both time and effort while keeping your videos looking top-tier. Here are a few reasons why every creator should try them:
- 🎨 Professional Look Instantly: Get film-like color tones without learning complex grading.
- ⚡ Time Saver: Instead of tweaking color settings for hours, apply a LUT in seconds.
- 📱 Consistent Style: Perfect for maintaining a similar look across all your videos or brand content.
- 🧩 Customizable: You can still adjust brightness, contrast, or exposure after applying a LUT.
- 💡 Beginner-Friendly: Even if you’re new to editing, LUTs help you look like a pro.
Whether you’re editing travel vlogs, gaming clips, or short TikToks, LUTs can make your content pop on every platform.
Some premium LUTs or filters in CapCut are only available for Pro users. However, with the CapCut Mod APK, you can access all LUTs and color presets for free—no watermark, no subscription required.
How to add Luts in Capcut?
Here’s how you can apply LUTs in CapCut easily — no advanced editing skills required.
Step 1: Open Your Project
Launch CapCut on your phone or PC, and open the video project you want to edit. You can also start a new project and import your clips.
Step 2: Go to the Color Grading or Filter Section
Once your video is loaded, tap on the “Adjust” or “Filter” option in the toolbar. This is where CapCut allows you to fine-tune visuals or add color effects.
Step 3: Find the LUT or Color Preset Option
Scroll through the filters — you’ll see a section called “LUTs” or “Color Filters.” CapCut often names them after moods like “Cinematic,” “Retro,” “Warm,” or “Cool.”
If you don’t see the LUT option, make sure you’ve updated to the latest version of CapCut, as LUT support is available in newer releases.
Step 4: Apply the LUT
Tap on a LUT to preview how it looks. You’ll instantly notice how your video changes in tone and mood. If you like it, hit “Apply” or “Checkmark.”
Step 5: Adjust Intensity
CapCut lets you control how strong or subtle the LUT effect is. You can use the intensity slider to make the effect softer or stronger according to your preference.
Step 6: (Optional) Import Custom LUTs
If you’ve downloaded a .cube LUT file from the internet or bought premium ones, you can also import them into CapCut.
Here’s how:
- Go to Adjust → Custom LUTs → Import.
- Select your LUT file from your device.
- Apply it and adjust as needed.
Step 7: Export Your Video
Once you’re happy with the color look, export your video in high quality (1080p or 4K). Now your clip has a professional-grade color tone ready to wow your audience!
Tips for Getting the Best Results with LUTs
Here are some smart tricks to get cinematic results every time:
- 🌤️ Start with Well-Lit Footage: LUTs work best on clear, bright videos. Poor lighting can make them look off.
- 🔧 Tweak After Applying: You can fine-tune brightness, contrast, or shadows even after applying a LUT.
- 🎥 Use Matching LUTs: Use LUTs that fit your content type — warm tones for travel, cool tones for tech, soft tones for lifestyle.
- 💾 Save Favorites: CapCut lets you favorite LUTs so you can quickly reuse them in future edits.
Common Mistakes to Avoid
Even though LUTs are easy, here are a few mistakes you should avoid:
- ❌ Using too strong a LUT — it can make your video look unnatural.
- ❌ Forgetting to adjust exposure before applying LUTs.
- ❌ Applying different LUTs on multiple clips in the same video (it breaks consistency).
Keep your tone consistent, and your video will look smooth and professional.
FAQs
Final Thoughts
Using LUTs in CapCut is one of the fastest ways to improve your video’s overall look. Whether you’re creating short-form content for TikTok, reels, or YouTube edits, LUTs can transform ordinary clips into scroll-stopping visuals.
So next time you edit, skip the endless adjustments — just add a LUT, tweak a few settings, and watch your videos come to life!
Once your visuals are perfect, don’t forget to enhance your sound — here’s how to edit audio in CapCut.”