Filters & Color Grading in CapCut (Full Guide) Pro Tips
Every creator wants their videos to stand out, but dull colors and uneven lighting can make even great footage look boring. That’s where filters and color grading in CapCut come in. Whether you’re editing a travel vlog, TikTok clip, or cinematic reel, mastering CapCut’s color tools can instantly make your video look polished and professional—without needing expensive software or advanced editing skills.

🏷️ What Are Filters and Color Grading in CapCut?
In simple terms, filters are ready-made color effects that change your video’s look with one tap. You might have seen them labeled as “Warm,” “Cinematic,” or “Retro.” They instantly add a mood or tone to your clip.
On the other hand, color grading is about manually adjusting settings like brightness, contrast, saturation, and temperature. It gives you full control over your video’s color style so it looks exactly how you imagine—cool and moody or bright and vibrant.
Together, these two tools make CapCut not just a mobile editor, but a professional-grade color editing app.
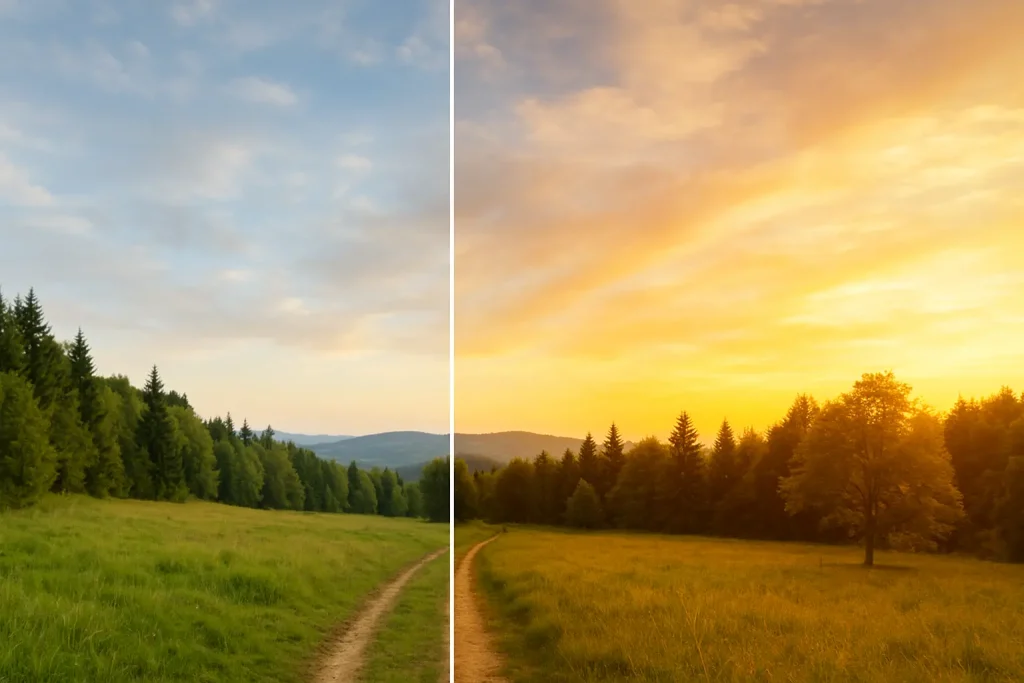
Left: Unedited clip. Right: After applying the “Cinematic” filter with contrast and warmth adjustments. Notice how the mood and color pop instantly. Visuals like this help your readers understand the power of proper grading.
🎨 How to Use Filters in CapCut (Step-by-Step)
- Open Your Project – Launch CapCut and import your video.
- Go to Filters – Tap on your clip, then choose the Filters option at the bottom.
- Browse Effects – CapCut offers multiple categories like Life, Retro, Cinematic, Dreamy, and more.
- Apply and Adjust – Once you pick a filter, use the intensity slider to adjust how strong the effect looks.
- Apply to All Clips – Want the same tone throughout? Tap “Apply to all” to make your entire video look consistent.
💡 Pro Tip: Use filters lightly. A subtle effect often looks more natural and professional than an overdone one.
🎛️ How to Do Color Grading in CapCut?
Color grading gives you deeper control than filters. Here’s how:
- Select Your Clip → Tap the video you want to edit.
- Go to Adjust → Choose “Adjust” from the bottom toolbar.
- Tweak the Basics → Start with brightness, contrast, saturation, and exposure to balance your clip.
- Fine-Tune Colors → Play with temperature, highlights, shadows, and tint to create your desired mood.
- Use HSL (if available) → HSL lets you change specific color tones, such as making skies bluer or skin tones softer.
💡 Pro Tip: Try increasing contrast slightly, reducing highlights, and warming the temperature for a cinematic effect.
🌈 Best Filter & Color Combinations for Different Styles
| Style | Recommended Filter | Adjustments |
|---|---|---|
| Cinematic Look | Retro / Movie | Increase contrast, lower highlights |
| Vlog / Travel | Warm / Bright | Boost saturation, add warmth |
| Aesthetic Edit | Dreamy / Fade | Lower contrast, slightly blur |
| Professional Look | Natural / Clear | Balanced brightness and shadows |
| Night Video | Cool / Neon | Reduce exposure, increase contrast |
These combinations work beautifully for Reels, TikToks, or YouTube Shorts.
⚙️ Advanced Tip: Combine LUTs with Color Grading
If you’ve mastered filters, try LUTs (Lookup Tables) next. LUTs help you copy professional color tones used in films. CapCut lets you import LUTs easily to enhance your grading game.
👉 You can read our guide on How to Use LUTs in CapCut to explore advanced color tools.
💡 Why Filters and Color Grading Matter
Color is emotion. Warm tones make a video feel happy and cozy, while cool tones create calmness or mystery. By using CapCut’s filters and grading tools smartly, you can tell stories visually and connect better with your audience.
It’s not just about making videos “look good”—it’s about making them feel right.
Real Experience Behind This Guide
I’ve been using CapCut for over 3 years to edit YouTube Shorts and TikTok videos. From vlogs to cinematic travel edits, I’ve found that the Cinematic, Warm, and Retro filters consistently give natural skin tones and beautiful lighting.
My personal go-to color grade? Slightly lower the highlights and increase contrast by about 15%. That combination gives the video more depth and a professional touch — even if shot on a phone.
These tips are from real editing experience, not just theory. I’ve tested them on mobile and PC, so you can trust they actually work.
⚠️ Common Mistakes Beginners Make in CapCut Color Grading
Many new editors accidentally ruin good footage with the wrong grading. Here’s how to avoid it:
- Overusing Saturation – Makes colors too strong. Keep it under 25%.
- Ignoring Exposure – Adjust exposure before applying filters.
- Different Filters on Each Clip – Always use one consistent style.
- Wrong White Balance – Avoid orange or blue tones by balancing temperature.
- Not Checking Brightness – Always preview your edit at full brightness.
Avoiding these mistakes gives your videos a cleaner, more cinematic finish.
🧩 Recommended Tools to Improve Your Color Game
If you want even more control, try these free tools:
- CapCut PC Version: More advanced color settings.
- Snapseed: Great for testing tone curves.
- Lightroom Mobile: Perfect for creating custom LUTs to import later.
- VN Video Editor: Alternative app for testing filter intensity.
These tools help you experiment beyond CapCut’s basics.
💡 Expert Tips for Consistent Color Grading
- Use the same lighting setup when filming to make grading easier.
- Apply the same filter settings across all clips for consistency.
- Save your favorite grading style as a custom preset for future videos.
- Export in 1080p or 4K for the best color clarity on social platforms.
🎯 Conclusion
Using filters and color grading in CapCut is the fastest way to make your videos look polished and cinematic. Whether you’re editing a vlog, short, or reel — these tools help you stand out online. Keep experimenting, stay consistent, and remember: professional results don’t require professional gear — just the right adjustments.