Best CapCut Export Settings for YouTube to Avoid Quality Loss
Exporting your video is the final step before publishing on YouTube, but it’s also where many creators accidentally lose quality. Even a perfectly edited video can look blurry or compressed if the wrong settings are used. That’s why choosing the best CapCut export settings for YouTube is important. With the right resolution, bitrate, and frame rate, you can keep your videos sharp and professional after YouTube processes them.
Overview
Uploading a video to YouTube is more than just clicking export. The quality your audience sees depends heavily on how you export your project. Many creators edit carefully, color grade properly, and improve audio — but then lose sharpness because they didn’t choose the right export configuration. The best CapCut export settings for YouTube include 1080p resolution, matching frame rate, 15–20 Mbps bitrate, and MP4 (H.264) format. These settings help maintain quality after YouTube compression.
Why Export Settings Matter for YouTube?
YouTube re-encodes every uploaded video. This means your file gets compressed again after upload. If you export at low quality, YouTube compresses an already compressed file — leading to visible quality loss.
The goal when choosing CapCut export settings for YouTube is to give the platform a high-quality source file so its compression algorithm preserves as much detail as possible. Exporting at extremely high settings is not always necessary. Instead, you need balanced settings that match your footage and content type.
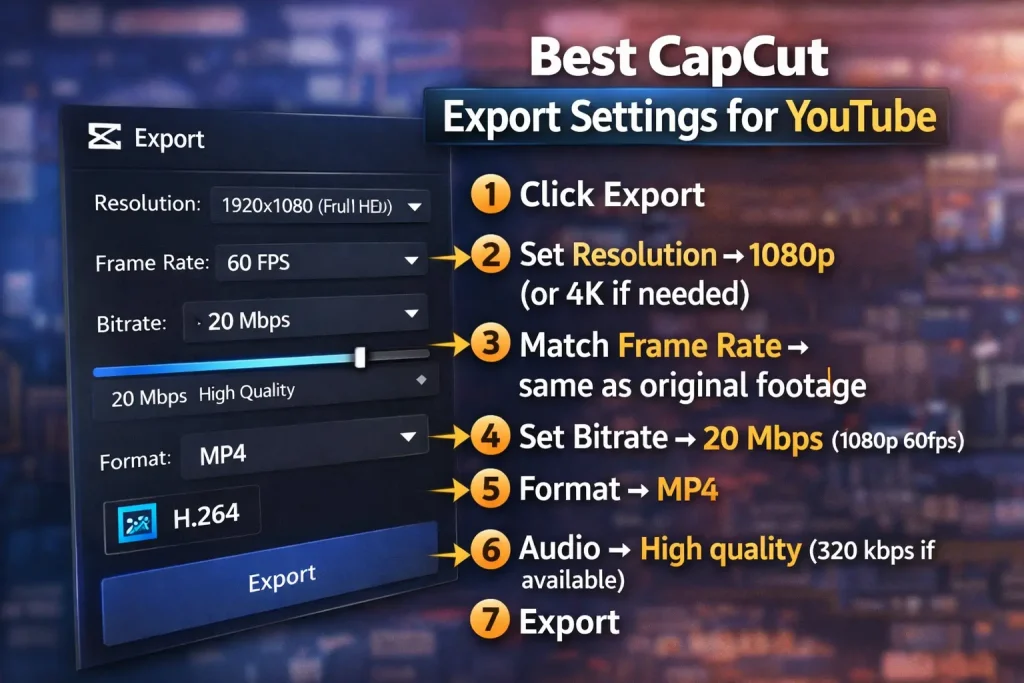
Step-by-Step: Best CapCut Export Settings for YouTube
Here’s a simple export checklist: Simple settings, maximum clarity.
- Click Export
- Set Resolution → 1080p (or 4K if needed)
- Match Frame Rate → same as original footage
- Set Bitrate → 20 Mbps (1080p 60fps example)
- Format → MP4
- Audio → High quality (320 kbps if available)
- Export
Best CapCut Export Settings for Different Content Types
1. 🎮 Gaming Videos
- 1080p or 4K
- 60fps
- High bitrate (20–25 Mbps or more)
2. 🎤 Talking Head Videos
- 1080p
- 30fps
- 15–20 Mbps
3. 🎬 Cinematic Content
- 24fps
- Higher bitrate for detail preservation
4. 📱 Shorts (Vertical)
- 1080×1920
- 30fps
- Balanced bitrate
Different content types require slight adjustments, but the principles stay the same.
Resolution: 1080p vs 4K — What Should You Choose?
Resolution is the first major decision when exporting.
1. 1080p (1920×1080)
- Ideal for most creators
- Smaller file size
- Faster upload
- Great for talking-head videos, tutorials, and gameplay
For most channels, 1080p remains the safest and most practical choice.
2. 4K (3840×2160)
- Sharper detail
- Better compression results on YouTube
- Future-proof content
- Larger file size
Even if you recorded in 1080p, exporting in 4K can sometimes result in better compression quality on YouTube. However, only do this if your footage is high quality and your PC can handle it smoothly. For most creators looking for the best CapCut export settings for YouTube, 1080p at a high bitrate is more than enough.
Matching Frame Rate to Your Footage
Frame rate affects how smooth motion appears. The most important rule is simple: always match the export frame rate to your original recording. If you recorded at 30 frames per second, export at 30 fps. If you recorded gaming footage at 60 fps, export at 60 fps.
Changing frame rate during export can cause motion inconsistencies and subtle stuttering. YouTube supports multiple frame rates, so there is no advantage in converting unless necessary.
Maintaining the original frame rate preserves natural movement and ensures the video looks consistent.
Bitrate: The Most Important Setting for Quality
When discussing the best CapCut export settings for YouTube, bitrate plays the biggest role in preserving detail.
Bitrate controls how much visual information is stored per second of video. A low bitrate reduces file size but can cause visible compression artifacts, especially in fast-moving scenes or complex backgrounds.
For 1080p content, a bitrate between 15–20 Mbps provides strong clarity. If you are exporting 60 fps content, slightly increasing the bitrate helps maintain motion smoothness.
For 4K videos, higher bitrates are recommended to preserve detail.
If your content includes gaming, sports, cinematic movement, or heavy transitions, using a slightly higher bitrate prevents pixelation after YouTube compression.
Best Format for YouTube Upload
CapCut allows exporting in different formats, but MP4 using H.264 encoding is the safest option for YouTube.
MP4 files are widely supported, efficient in compression, and compatible with YouTube’s recommended upload guidelines. Choosing another format rarely provides any benefit unless you have a specific technical reason.
Keeping the export format simple ensures fewer compatibility issues during upload.
Audio Export Settings for Clear Sound
Video quality matters, but audio quality can make or break viewer retention. Even perfectly sharp visuals cannot compensate for distorted or low-quality sound.
For YouTube uploads, exporting with high-quality AAC audio ensures voice clarity and balanced music levels. Using a higher audio bitrate prevents compression distortion, especially in videos that rely heavily on background music.
If your video contains dialogue, podcasts, or commentary, prioritize clean and balanced audio during export.
PC vs Mobile Export Differences
CapCut on PC generally provides more consistent export control compared to mobile devices. Desktop hardware handles large projects and higher resolutions more smoothly.
Mobile exports can sometimes be limited by device performance, storage space, or thermal throttling. While mobile export quality is still strong, serious YouTube creators may prefer exporting from a PC for better control over bitrate and rendering stability.
Common Export Mistakes to Avoid
- One common mistake is reducing the bitrate too much to save file size. This often results in double compression after YouTube processing.
- Another mistake is mismatching the frame rate during export. This can subtly reduce smoothness and cause unnatural playback.
- Upscaling low-resolution footage to 4K without a quality source material is another error that does not improve clarity.
- Avoiding these mistakes helps preserve professional quality.
Recommended Universal Settings
If you want a universal setup that works in most cases:
- Resolution: 1080p
- Frame Rate: Match source (usually 30fps or 60fps)
- Bitrate: 20 Mbps
- Format: MP4
- Audio: High quality
This combination delivers strong clarity while keeping file size manageable.
FAQs
1. Does Exporting in 4K Help You Rank Higher on YouTube?
Uploading in 4K does not directly improve YouTube SEO rankings. However, higher resolution uploads may receive better compression processing, which can slightly improve playback clarity. Viewer retention and engagement matter more for ranking than resolution alone.
2. Does YouTube reduce video quality after upload?
Yes, YouTube compresses all videos. Using proper CapCut export settings helps reduce visible quality loss.
3. Is 1080p or 4K better for YouTube uploads?
Both work well, but 1080p is the most common choice for creators because it balances quality and file size. 4K uploads can sometimes receive better compression processing, but they require more storage and longer upload times.
4. How long does YouTube take to process HD videos?
YouTube usually processes SD first, then HD versions like 1080p or 4K. Depending on video length and resolution, HD processing may take several minutes to a few hours.
Final Thoughts
Choosing the best CapCut export settings for YouTube is about understanding balance. You don’t need extreme maximum values, but you do need consistent resolution, matched frame rate, and healthy bitrate.
When you export correctly, YouTube compression has better source material to work with, resulting in sharper playback and cleaner motion. Small adjustments at the export stage can significantly improve how professional your content appears online.
Mastering this step ensures your editing effort is fully preserved when your audience hits play.